How to Dual Boot Windows 11 and Linux on One PC
Manufacturers are shipping computer with Windows 11 preinstalled since Windows 11 was made available to the general public by Microsoft. A new question is arising for a few Windows 11 users. Is it possible to dual boot Windows 11 and Linux on a single machine?
This is a frequently asked question as Linux is quite useful for certain tasks. Honestly, you can use built-in WSL feature on Windows 11, which stands for Windows Subsystem for Linux, however, it is nowhere as elegant a solution as using Linux.
In this tutorial, we will help you dual boot a computer, that has Windows 11 running on it, by installing Linux on that same computer. However, you can modify this tutorial to install Windows 11 on a computer running Linux as well by modifying just a few details.
Part 1: Creating a Linux Bootable USB
First things first, you’ll need a Linux bootable USB to installing Linux on your Windows 11 computer. You are free to choose any Linux distro that you like. In this tutorial, we will be choosing Ubuntu since it is one of more popular Linux distros. You’ll also need a tool called Rufus to create a bootable Linux USB.
Given below are the required links from where you can download both the Ubuntu ISO image file, and Rufus:
- Ubuntu ISO image: https://ubuntu.com/download/desktop
- Rufus: https://rufus.ie/en/
Along with these, you’ll also need a blank USB flash drive. Make sure it is blank, or you have taken a data backup since all the data within it will be deleted through this process.
Once you are ready, follow the below steps to create a Linux bootable USB:
- Launch Rufus as it doesn’t need to be installed.
2. Once Rufus is running, under Device select your USB flash drive, then under Boot Selection, click on SELECT and choose the Ubuntu ISO image file. Leave the rest of the options as-is, and click on START.
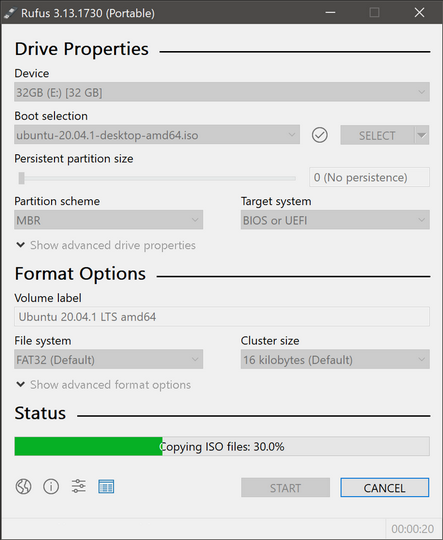
We have successfully created a bootable USB for installation. Now, we need to create a new partition on the internal drive to keep Linux OS.
Part 2: Creating a Separate Partition for Linux
You can install Linux on the same drive where you have Windows 11 installed. However, it is a recipe for disaster. Your computer will be riddled with errors and you will not be able to use either Linux or Windows 11. So, it is good practice to create a separate partition where you would be able to install Linux. Here’s how you can do it:
1. Unlock Windows 11 and get into the Windows 11 desktop.
2. Right click on the Windows Start menu icon, then select Disk Management.

3. Under the Disk Management window, you’ll be able to see all the drives (including some hidden partitions) listed there. Select the drive where you have the maximum space, right click on that partition, and click on Shrink Volume.
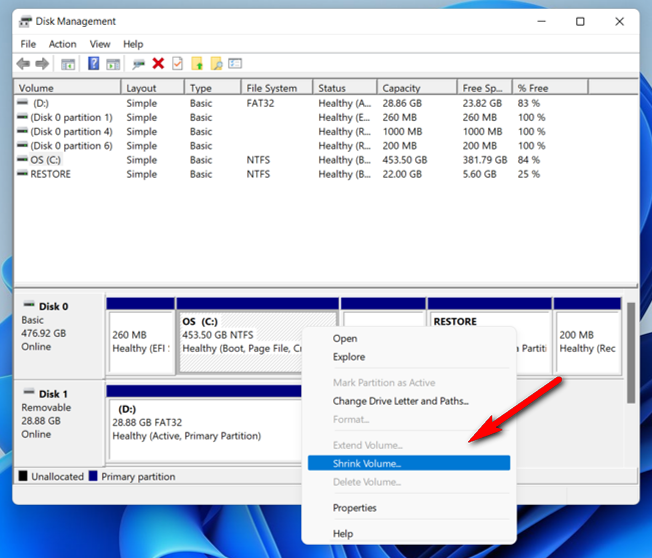
4. This should bring up another small window. Here you need to specify the size of the new partition that you would like to create for Linux. This exact amount of space will be deducted from the Windows 11 partition, or the partition from which you are allocating space, and will create a new partition. This new partition will show up as Unallocated Space, don’t worry about it since we will take care of it while installing Linux.
Once done, close everything, including Disk Management, and prepare to install Linux.
Part 3: Installing Linux on New Partition
We have gathered all the ingredients to install Linux, so let’s start with the installation process. I would suggest you to keep this tutorial open on a different device since, while Linux is being installed on your computer, you’ll not be able to view it on the same computer. Also, make sure that your computer is plugged in to a power source, and has at least 50% charge to begin with.
1. Close all the programs on Windows 11.
2. Insert the Linux bootable USB that we created in your computer.
3. Press and hold down the Shift key on your keyboard, then while holding it down click on Restart.
4. That should restart your Windows 11 computer in Advanced Startup mode. Here you will get a number of options, you need to select the option Use a Device. Once you see a list of devices you can boot from, select the USB flash drive.

5. Once done, you’ll see the Ubuntu boot menu. Press Enter to boot into Ubuntu.
6. Now, you’ll see the below window where you can either try Ubuntu or install it. Click in Install Ubuntu on this window to move to the next step.
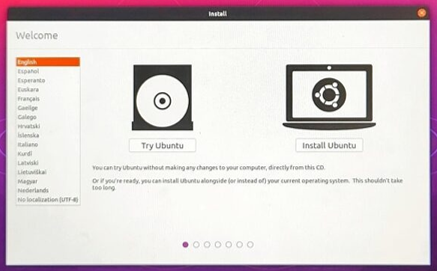
7. From this step onward, simply follow the instructions on the screen. You’ll be asked to choose your keyboard setup, connect to a network and so on. Once you reach the below screen, select the option that says Install Ubuntu alongside Windows Boot Manager, and click on Install Now.
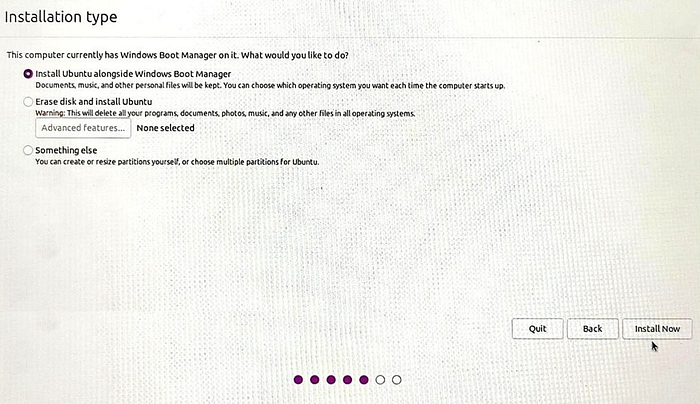
8. After this, simply follow the instructions on the screen and choose the most appropriate options, for example, your region, data and time settings etc. and you should be able to install Linux without any problem at all.
Once the installation is completed, you should be able to boot into your Linux desktop on your computer without the USB flash drive. But that’s not all, we have one more crucial step left.
Part 4: Dualboot Windows 11 and Linux (Switching OS)
Don’t worry if you are not given the option to boot into Linux right after you have installed it. Chances are that the Windows 11 partition on your computer is set as primary boot or priority partition because of which you can only boot into Windows 11 even though you have successfully installed Linux. Here’s how you can change this behavior:
1. Login the Windows 11 PC.
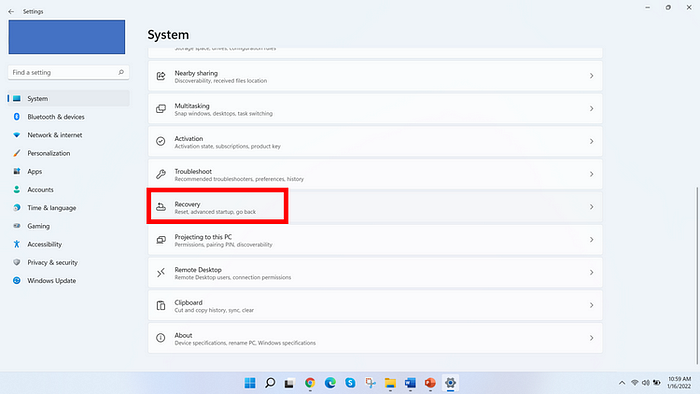
2. Click on Start, then go to Settings -> System -> Recovery.
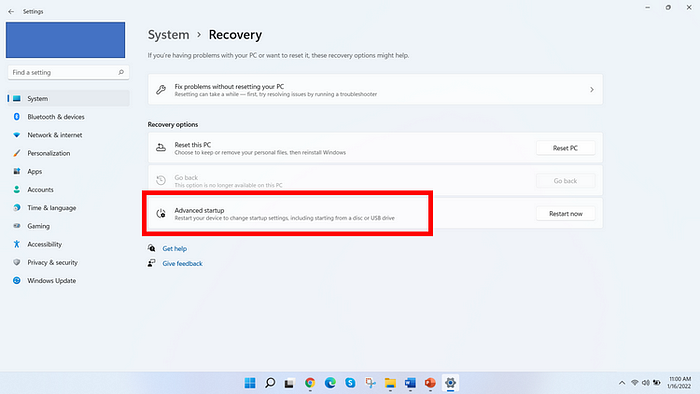
3. Once inside Recovery, click on Restart Now beside the Advanced Startup options.
4. Next, click Troubleshoot -> Advanced Options -> UEFI Firmware Settings.
5. This will restart your computer and take you to UEFI settings. Here, look for Boot Order. You’ll find the option for Boot Manager under Boot Order. Select it, then ensure that Linux is at the top of the Boot Manager options and not Windows 11. You might not be able to use your mouse here depending on the manufacturer of your computer, use the up and down arrow keys to navigate, and the F5 and F6 keys to move the options.
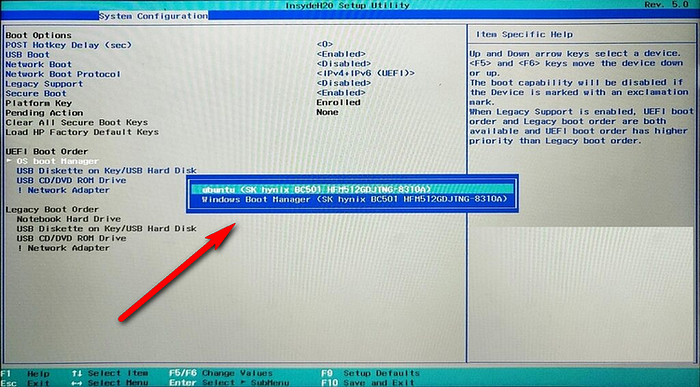
6. Once done, save your changes and exit the UEFI settings. Next time you boot your computer, you’ll see the Linux boot menu using which you should be able to choose whether to boot into Linux or Windows 11.
Great! Finally, we are done and you successfully installed Linux alongside Windows 11 as dual boot. If you ever decide to use Linux solely on the computer, use the GPart or any other similar program on Linux to delete the Windows 11 partition, or if you would like to uninstall Linux, then go back to the Disk Management program we used earlier in Windows 11 and formate the Linux partition. Wasn’t that easy!
