3 Proven Ways to Create a Windows 7 Bootable USB Installer on Mac
Windows 7 is a fan-favorite operating system and a lot of people now stick to it as it is more stable than Windows 10 and no annoying auto update. However, we need a bootable Windows 7 before using this popular desktop operating system. If you only have a Mac at hand, how could you create a bootable Windows 7 USB on macOS?
In this tutorial, we are going to show you how to create a Windows 7 bootable USB on a Mac so you can install Windows 7 on a new PC build or repair an old computer. Before we begin, make sure you now have a USB with at least 16GB of storage space.
We come with the easiest one first.
1. UUByte ISO Editor
Honestly, Boot Camp Assistant should be our first choice when it comes to creating Windows bootable USB on Mac as it is free and come with macOS by default. However, there are two many restrictions and errors in macOS Catalina and Big Sur. Currently, it is more practical to use UUByte ISO Editor according to our researching.
UUByte ISO Editor is one of the best apps when it comes to burning and extracting ISO image on Mac. It features a simple user interface, making navigation much easier. The best part is that it supports both Windows and Mac and runs smoothly even on low-end PCs.
Additionally, it has the ability to extract files from an ISO image. In fact, it instantly opens your ISO image in some simple steps, allowing you to view the content without any restrictions on all platforms.
The software is now available in both free trial and paid version. The free version unlocks everything about it, giving you a detailed look at its premium features before paying for it. The process is pretty simple and straightforward. Here are the steps.
https://www.uubyte.com/download/uubyte-iso-editor.dmg
Step 1: Click the above download link, install UUByte ISO Editor app on your Mac and insert a USB drive.
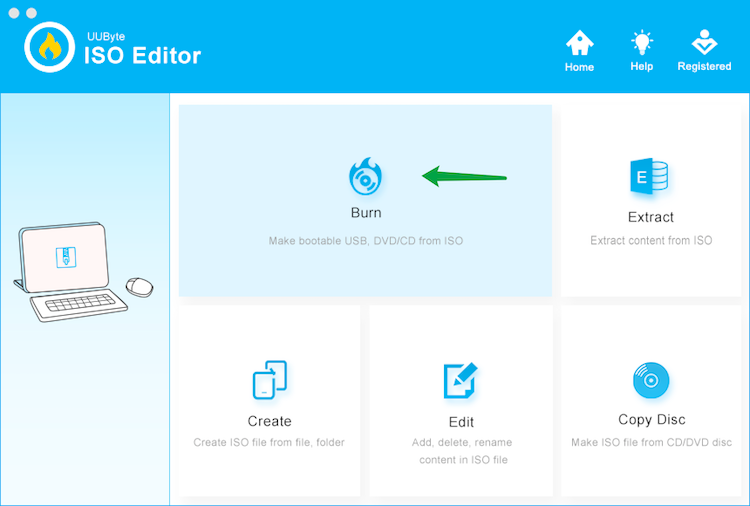
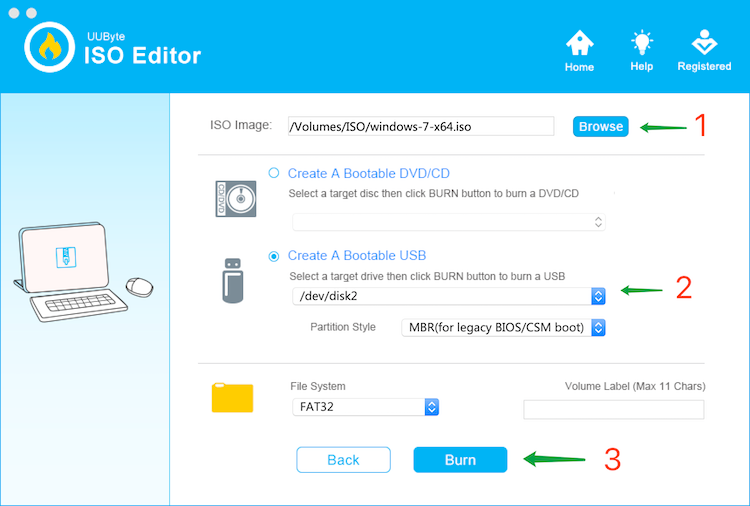
Step 2: Now, you need to load Windows 7 ISO. When your USB drive is detected within the app, click the Burn button from the main menu. From here, you can leave all the settings by default and then import your Windows 7 ISO file.
Step 3: Once you are done, hit the Burn button. You will be prompted to format the disk if you have not already done so. In this case, make sure there is nothing important on it as the process will wipe everything.
Step 4: The process should begin and may take several minutes (around 2 minutes).
Step 5: Once done, your USB is a bootable version of Windows 7, so you can install it on any machine.

This is the easiest way to create Windows 7 bootable USB installer on Mac as far as I know. It is fast and has less errors. And you will get fast reply from their support team.
The main drawback is that it does not include a free version as you need to pay some cash when your trial ends.
2. Unetbootin
Unetbootin is another third-party tool that lets you create bootable USB flash drives on both Windows and macOS. Unlike UUByte IOS Editor, Unetbootin won’t erase your USB drive during the process. That means that you need to make sure that you have enough space before proceeding.
One of the best things when it comes to UNetbootin is the ability to house a whole functional OS on a USB drive based on the Live-CD principle. From here, you can easily boot your system from your Live CD.
Installing the software is as easy as you always do. Simply download it from its official webpage and then open the installer to kick off the installation process. From here, simply follow the instructions to complete the setup. Once done, proceed with our steps below.
Step 1: Make sure you now have Windows 7 ISO image file before moving ahead. After that, open the tool on your Mac machine
Step 2: From the main menu on the screen, select your file by clicking the three dots button (if the tool fails to detect your USB drive, then try unplugging the device and try again).
Step 3: After ISO import, you have to choose the USB drive in Mark 2. We recommend unplugging other USB devices from Mac and only leaves the USB for creating bootable disk.

Step 4: Once everything is ready, hit the OK button and let UNetbootin decompress and copy ISO files to USB drive. The process may take several minutes and you will see a progress bar for that.

In one word, Unetbootin is one of the top recommendations when it comes to creating Windows bootable USB on macOS. However, it is currently an open source tool, so it still needs some improvements from developers. You may experience lags and bugs during the process.
3. Terminal
Terminal is a built-in Mac tool that allows you to perform some cool tasks. However, you need to play around with text commands to get the job done. In fact, you can create Windows 7 USB on a Mac system using Terminal without any additional downloads.
If this is the first time you use text commands, then the process may be a little bit confusing. So, make sure you follow our guide below.
Step 1: Launch the Terminal app on your Mac (You can launch it by using Spotlight) and then enter this command: diskutil list external. This command is to list all external drives that are linked to a Mac. In the following example, disk 2 is the USB drive we will use to create bootable media.

Step 2: Locate your USB drive from the list and take note of its name. After that, you need to unmount it. To do this, use this command:
sudo umount /dev/disk2s1
Step 3: Now, you need to format the drive to a Windows acceptable partition MS-DOS FAT with Master Boot Record scheme. This can be done in Disk Utility app.

Step 4: Write files and folders in Windows 7 ISO file to USB drive. To do this, use this command:
sudo dd if=~/Desktop/Windows-7-x64.iso of=/dev/rdisk2s1 bs=1m
Step 4: Terminal will start burning your USB drive to create Windows 7 bootable USB drive on Mac. Once done, eject the drive using this command:
diskutil eject /dev/disk2s1
Playing with commands is much harder and the risk is high. You may get your internet drive wiped if you input a wrong command. So this is only recommended for advanced users. If you have enough budget and want to save time, then go ahead with UUByte ISO Editor. If you prefer using a free app to create Windows 7 bootable USB installer on Mac, then UNetbootin is a perfect fit for that.
