[100% Working] Create a Windows 10 Bootable USB on Mac Sonoma
My home laptop recently was hit by virus and it ran into blue screen of death after reboot. Tried many solutions shared online but none of them worked to fix the issue. Finally, it comes to the ultimate weapon — clean install the OS like usual.
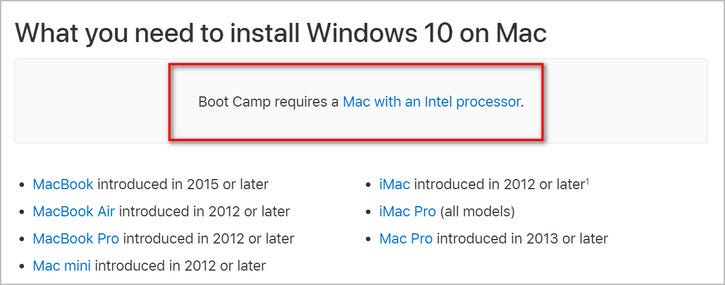
Can I Create Windows 10 Bootable USB on Mac Sonoma with Bootcamp?
No. Bootcamp is only compatible with Intel based Macs, which is the official statement made by Apple. The reason is that Apple has removed Bootcamp Assistant app from Apple Silicon Mac, like M1 and M2. It was the best app to make Windows bootable USB on Mac in the past.
Another fact you should pay attention to is that the bootable USB creation feature is removed from Bootcamp Assistant app since macOS Big Sur. You can only use it to install Windows 10 on Mac! Simply put, you can’t make a Windows 10 bootable USB on Mac Sonoma with Bootcamp.
[Failed] Terminal + Homebrew Not Working
So I googled a bit and a lot of folk suggest using the Terminal along with a batch of commands (Homebrew + wimlib). Unfortunately, this failed because Homebrew could not be installed on my M1 Mac. It says failed to connect to the GitHub website.

Basically, it is impossible to create Windows 10 bootable USB on Mac Sonoma with Terminal if homebrew is not working. So I have to give up this method in my own case.
[Success] Create Windows 10 Bootable USB on Mac Sonoma with ISO Editor App
After hours of researching and extensive testing (quite time consuming for burning Windows 10 ISO as it is too large,) the only app that worked with success is UUByte ISO Editor, one of the robust software for ISO burning, mounting and editing.
How to Create Windows 10 Bootable on Mac without Bootcamp and Terminal:
- Go to the Windows 10 product page and download Windows 10 ISO from Microsoft website. This is the most recommended way as third-party download might have virus or malware in the ISO file.

2. Download UUByte ISO Editor from it official website and drag the app icon to the Application folder so you can quickly open the app form Launchpad.

3. Connect a USB flash drive (less than 64GB) and run ISO Editor app on Mac Sonoma. Then, click the Burn button at the home screen.

4. From the new window, import the recently downloaded Windows 10 ISO and pick the name of USB drive.

5. Finally, click the Button at the bottom of the window to burn Windows 10 ISO to USB. At this time, you need to input the login password on Mac Sonoma to grant the permission to read and write external drive. You will see a progress bar on the screen.
Warning: The USB will be formatted. Please back up the drive first if necessary!

6. When the burning task is completed successfully, it starts to split the install.wim file, which is large than 4GB and can’t be saved on a FAT32 partition of USB drive.

7. You will see the burning successful message when the split is finished.

This means the whole task for creating Windows 10 USB on Mac Sonoma is done and you now have a Windows 10 bootable USB for OS installation or troubleshooting. In the sources folder of USB drive, the install.wim is cut into two small files.

The last step is to connect the USB to a machine and check if Windows 10 setup wizard is loaded successfully or not. In my case , there is no problem to install Windows 10 on my laptop from this bootable USB drive.

Further Notice about Etcher and UNetbootin on Mac Sonoma
I have seen a few folks in the Apple and Reddit discussion forum suggesting Etcher and UNetbootin, both of them are reputed bootable USB creation tool. What I need to say is that those posts are pretty old and the information is out of date.
According to my test on macOS Sonoma, none of them support to create Windows 10 bootable USB on my MacBook Air M1.
UNetbootin is marked as an app from unidentified developer and can’t be opened on Mac Sonoma.

As for Etcher app, it does not support Windows 10 ISO. Etcher is unable to work with Windows image as it requires special processing to be made bootable. And the suggested tools are no longer available on Mac as well.

Troubleshooting Tips for Creating Windows 10 Bootable USB on Mac Sonoma
- Why my USB is not shown on UUByte ISO Editor app?
The USB name is not showing when your Mac is in Dark mode. It will be fine if you switch to Light mode on Mac Sonoma. In addition, portable SSD is not seen as USB device in ISO Editor app.
2. How much time should I wait?
In my case, it took about 12 minutes to have a bootable Windows 10 USB on my M1 MacBook Air with Sonoma 14.0.
3. Can I Use Rufus on Mac Sonoma?
No. Rufus is great but not supposed to run on macOS. It is a Windows only app. However, you can set up a Windows 10 virtual machine and use Rufus from the virtual machine.
Conclusion
UUByte ISO Editor is working flawlessly on Mac Sonoma when it comes to create a Windows 10 bootable USB, even on M1 Mac. The process is straightforward and no need to enter any command to complete the task. It is an adorable solution for beginners. For advanced users, they can troubleshoot the homebrew tool and use Terminal app to make a Windows 10 bootable USB on Mac Sonoma with a set of combined commands.
